
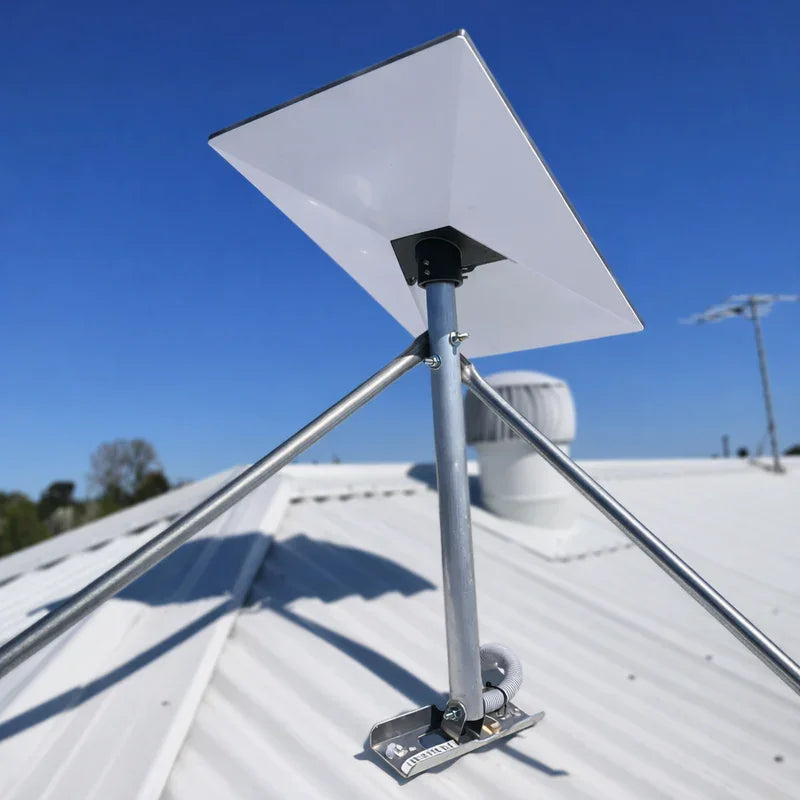
A Starlink mount for residential use positions the dish on a roof, exterior wall or ground pole so it can maintain the clear sky view required by the selected Starlink system. The right mounting approach depends on the dish model, roof structure, surrounding terrain, cable route and local weather conditions.
Hi, I'm Andrew Ziogas, managing director at SpaceTek Australia. With years of hands-on experience designing precision-machined hardware and supporting residential satellite installations across Australia, I share practical insights to help homeowners achieve seamless connectivity with durable mounting solutions.
What Are the Starlink Mount for Residential Use Key Takeaways?
- Choose a dish mount that suits the Starlink model, roof or wall construction, available sky view and cable route.
- Roof, wall, fascia, ridge and pole options solve different residential installation challenges.
- Confirm compatibility for mounting hardware, cables, adapters, networking equipment and power accessories before buying.
- Follow the selected dish mount, Starlink and roofing instructions for the appropriate fixing, sealing and positioning method.
- Plan the mount, cable run, indoor Wi-Fi coverage and power location together for a practical home setup.
Starlink Mounting Kits and Accessories for Residential Homes
The right Starlink mount depends on the dish model, roof construction, available sky view and how the cable will enter the home. A well-matched mounting setup gives the dish a stable, practical location without assuming one fitting method suits every property.
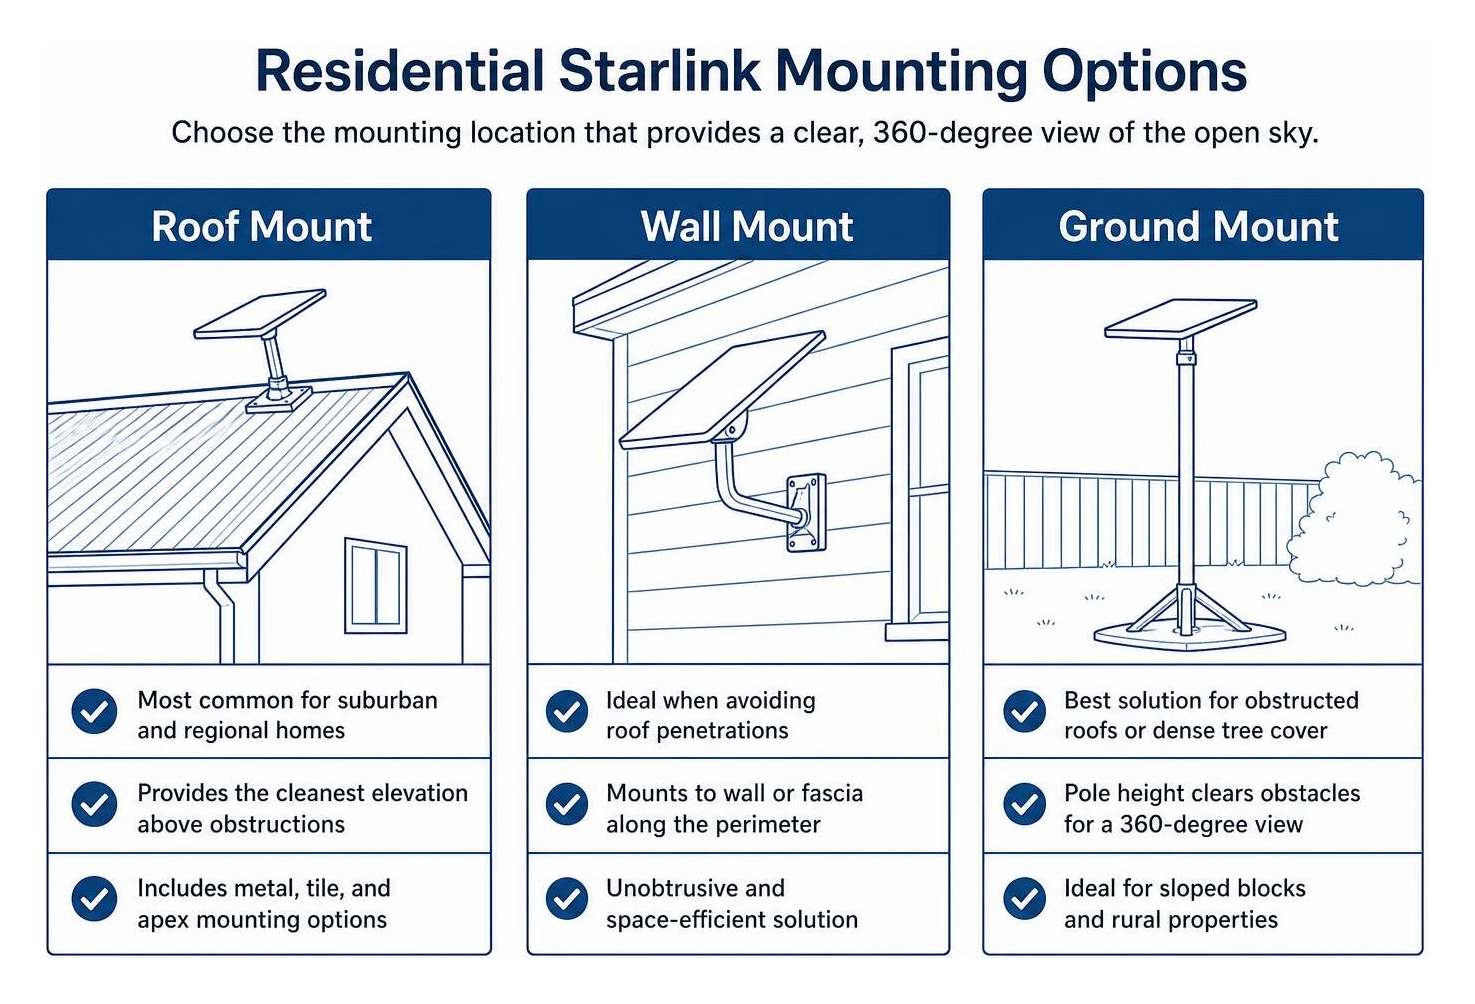
Choosing Roof, Wall, Fascia, Ridge and Pole Mounting Options
Metal and tile roofs often provide useful elevation, but the correct dish mount and fixing method depend on the roof profile, framing and the kit’s installation instructions. A folded aluminium roof mount may suit a compatible metal-roof installation, while tile-roof options need a method designed for the tile profile and underlying structure. Ridge, wall and fascia positions can be practical where they provide a clearer view or simplify cable routing.
A pole mount can make more sense on regional properties, in tree-lined blocks or where roof access is difficult. Before choosing a location, use the Starlink app’s obstruction check and consider safe access, wind exposure and the distance to the indoor equipment.
Complete Kits, Adapters and Installation Accessories
A complete mounting kit combines the dish mount and the fittings intended for a particular installation. An individual adapter can be useful when a homeowner already has a suitable base or mast, while installation accessories help finish the job neatly, such as cable clips, entry protection and compatible fasteners.
Compatibility is not just a general precaution: SpaceTek’s current mounting catalogue separates hardware for Starlink Standard (Gen 3 / V4), Gen 2, Mini and Performance models, with mounting types including metal roofs, tile roofs, walls, eaves, fascia and poles. For example, the catalogue lists Standard (Gen 3 / V4) roof and ridge-cap kits separately from Gen 2 roof mounts and model-specific pole adapters. Homeowners should use the exact model and mounting surface as the starting filters, then confirm the individual product listing before ordering. The SpaceTek Starlink mounting kits and accessories collection is a useful starting point for comparing compatible mounting hardware and installation components.
Planning a Stable, Serviceable Installation
Choose the location that balances a clear sky view with a sound mounting surface and a manageable cable path. Follow the instructions supplied with the selected dish mount, Starlink hardware and roof system rather than applying one universal drilling, sealing or fastening method. A mast may need to be positioned within the angle or verticality guidance for the specific Starlink model and mount, but the relevant product instructions should determine the final setup.
Starlink Cables and Accessories for a Tidy Home Installation
Starlink cabling connects the outdoor dish to the indoor equipment, so the right cable and routing plan are just as important as the dish mount. Replacement cables, connectors and adapters are model-specific, and homeowners should confirm compatibility before purchasing or extending an installation.
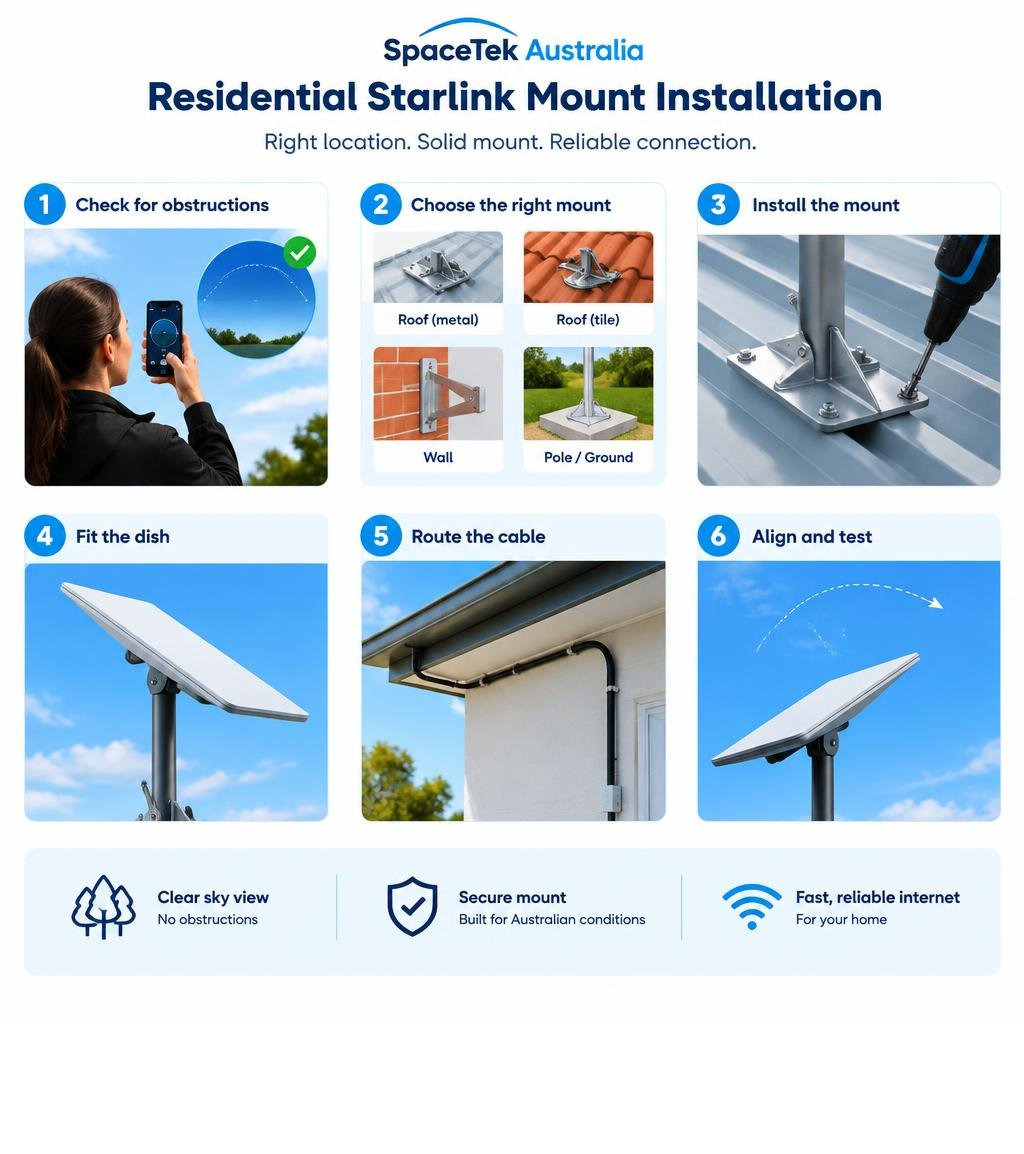
Selecting Replacement Cables, Lengths and Adapters
Cable length should be chosen around the real route from the dish to the indoor equipment, including safe bends, entry points and a little service slack. The available cable range can vary substantially by Starlink model: SpaceTek’s catalogue lists a Gen 2 replacement cable in lengths from 1.8 metres to 92 metres, while its Standard (Gen 3 / V4) replacement cable is listed as outdoor-rated Cat6. These are model-specific examples, not interchangeable specifications. Check the dish model and the product description before selecting a replacement cable or accessory.
The SpaceTek Starlink cables and accessories collection also lists model-specific options such as Mini DC cables from 0.2 metres to 20 metres, plus accessories including an IP68-rated Cat6A cable joiner and waterproof RJ45 adapters. For dish placement and obstruction checks before finalising the route, consult the official Standard Starlink setup guide, which directs users to check for obstructions in the Starlink app before installation.
Routing Cables Through Roofs and Walls
Plan the route before the mount is fixed. Keep the cable away from sharp edges, hot flues, moving roof components and areas where it could be crushed or exposed to unnecessary UV and weather. Use weather-appropriate entry protection and cable management suited to the building surface, following the cable and mounting instructions for the selected hardware.
For example, a coastal home may need a shorter, more protected external run, while a larger property may need a longer route from a roof-mounted dish to a central indoor network location.
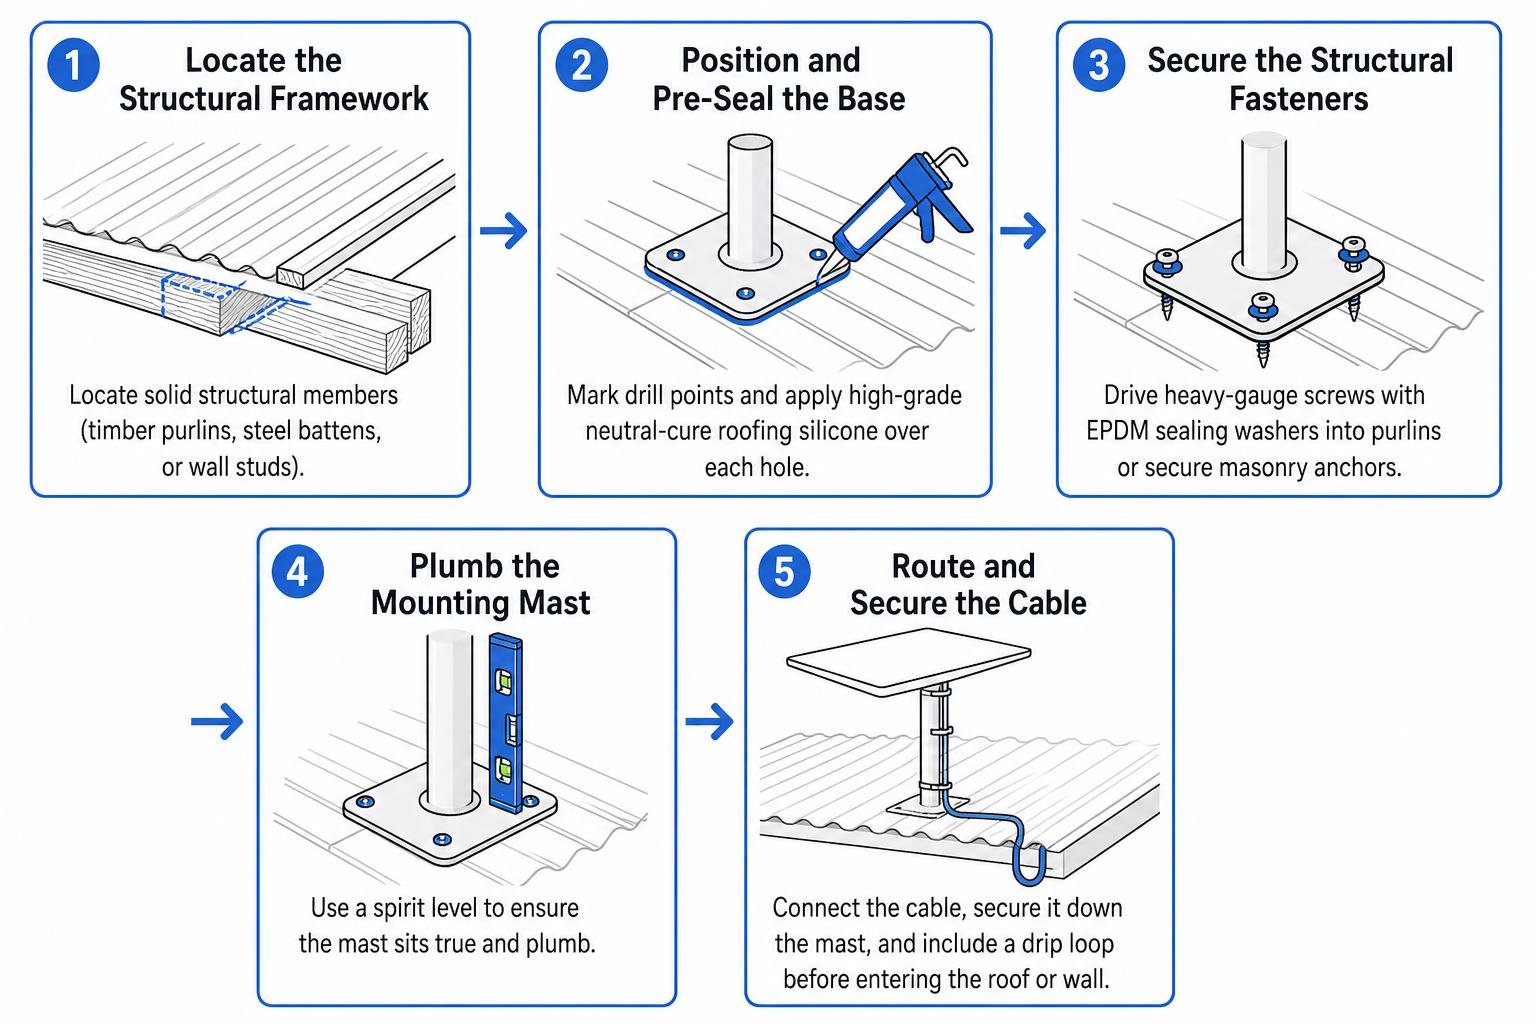
Cable Management That Keeps Future Servicing Simple
Neat cable management makes the installation easier to inspect, protect and service later. Clips, conduits, grommets and suitable entry accessories can reduce strain on the cable and keep the exterior finish orderly. Leave access to the relevant connection points where possible, and avoid permanent changes that make a future cable replacement unnecessarily difficult.
If roof access, drilling, wall cavities or electrical work are outside a homeowner’s experience, an authorised installer can help plan a safer installation.
Starlink Wi-Fi and Networking for Reliable Coverage at Home
A Starlink connection can reach the home successfully while Wi-Fi coverage inside still varies from room to room. Networking equipment helps distribute that connection where it is needed, but extra routers, mesh units and switches are useful only when the home layout or device needs call for them.

When a Router or Mesh System Helps
A single router can be enough for a compact home with clear internal signal paths. Larger households, multi-storey homes, dense internal walls and detached workspaces may benefit from a compatible mesh system that extends Wi-Fi coverage. Mesh units should be positioned based on the layout and signal path, not simply added because an installation includes Starlink.
The SpaceTek Starlink Wi-Fi, networking and mesh collection includes Wi-Fi 6 mesh options and 5-port Gigabit Ethernet switches. A five-port switch can provide up to four additional wired device connections after one port is used to link the switch to the router, provided the Starlink router and any required adapter support Ethernet. This gives homeowners a concrete way to assess whether a switch is useful for a home office, television, security equipment or other fixed devices.
Wired Connections, Switches and Extra Ports
Wired Ethernet connections can be useful for fixed devices such as desktop computers, smart TVs, security equipment or a home office. Where the Starlink setup and compatible accessories support it, a network switch can add ports for several wired devices without relying on Wi-Fi for every connection.
Before adding networking hardware, check the connection options supported by the Starlink model, router and any required adapter. This avoids buying equipment that does not match the existing setup.
Planning the Network Alongside the Mount and Cable Route
The best time to plan the indoor network is before the cable route is finalised. Consider where the router will sit, whether it needs ventilation and accessible power, and whether a wired link to another part of the home would solve a coverage issue. Connecting mounting, cable and network decisions early helps create a cleaner residential installation.
Residential Starlink Power Supplies and Accessories
Power equipment should be selected for the exact Starlink model and the home’s needs. A power supply provides normal operating power, a UPS or battery backup can provide short-term continuity during an outage, and an alternative power or router setup is a separate compatibility decision.
Compatible AC Power Supplies and Replacement Options
A compatible AC power supply is designed to run the relevant Starlink hardware from normal household mains power.
Exact electrical requirements vary by device: SpaceTek’s current residential collection lists a Router Mini replacement AC power supply rated at 9V, 1.5A, a Starlink Mini replacement AC power supply rated at 30V, 2A, and a replacement power supply for the Standard 4x kit (Gen 3 / V4) rated at 57V, 4A. These figures demonstrate why an older or different model should not be treated as interchangeable. Confirm the exact Starlink model, connector arrangement and product compatibility before ordering.
Homeowners can explore compatible options in the SpaceTek residential Starlink power supplies and accessories collection, which currently distinguishes replacement AC supplies, backup options and DC power accessories by model and use case. Match the listing to the existing hardware rather than selecting a supply by voltage or connector appearance alone.
UPS and Battery Backup for Short Outages
A UPS is a battery-backed device that can keep selected equipment running briefly when mains power drops. It is not a replacement power supply, and the suitable capacity depends on the equipment connected, the desired backup time and the manufacturer guidance. For regional homes with less reliable mains power, a UPS can help avoid interruptions to compatible indoor equipment during short outages.
Alternative Power and Router Setups
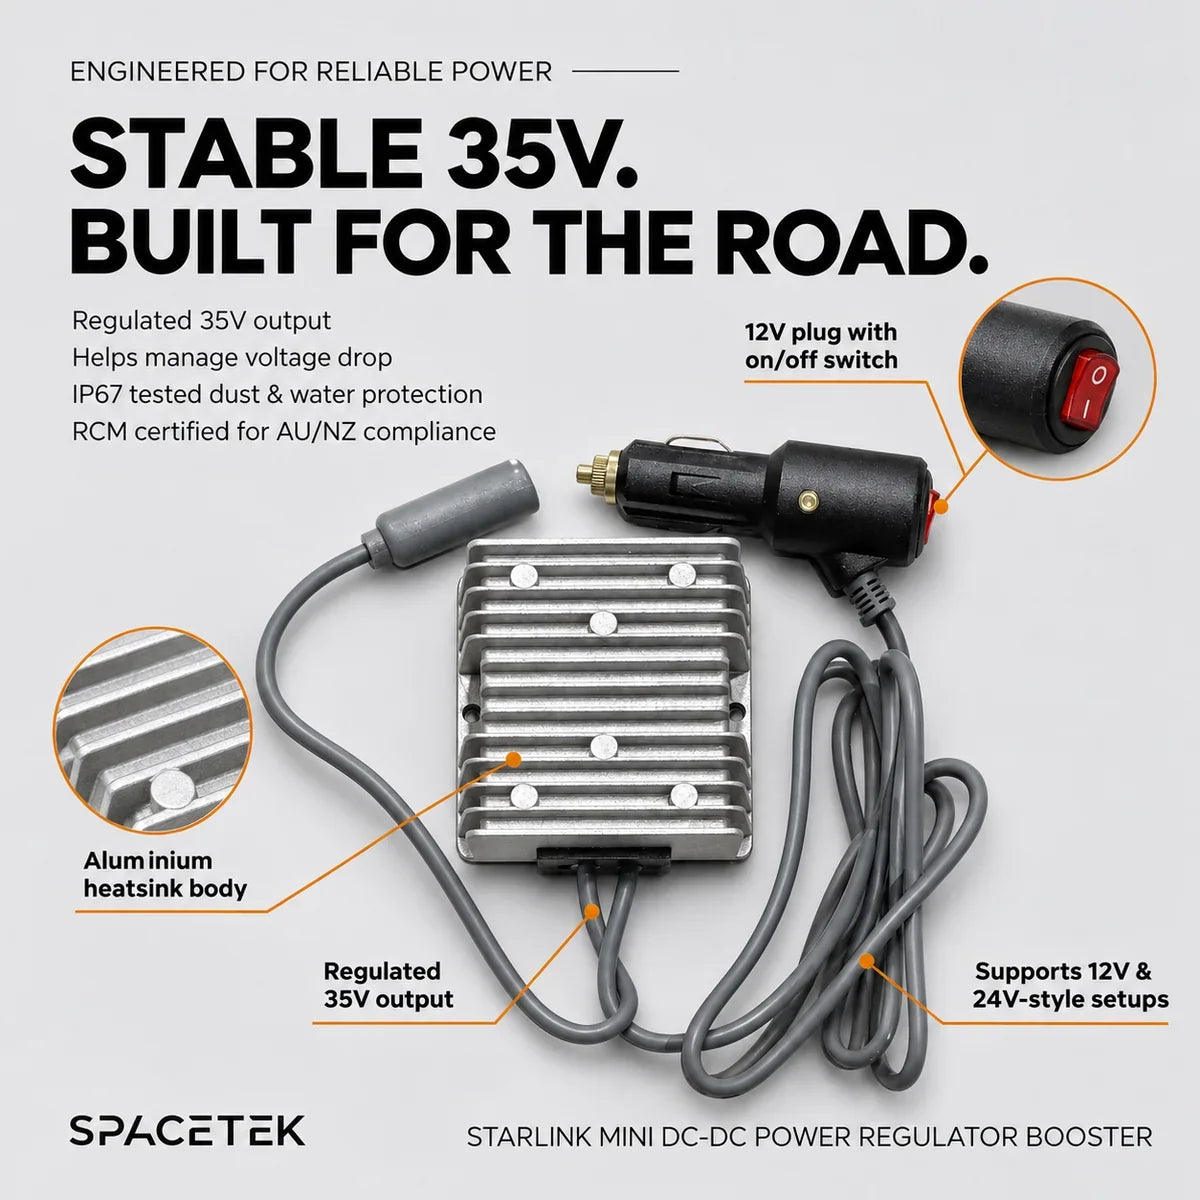
Some homeowners need a setup that works with a battery bank, off-grid system or custom network arrangement. These alternative solutions must be assessed for compatibility with the specific Starlink hardware and installation conditions. Where a compatible DC-to-DC solution is available, it can reduce conversion losses compared with running equipment through an AC inverter, lower idle power draw and support custom router arrangements. It is not a universal substitute for every Starlink kit.
Plan the mounting, cable run, indoor networking and power location together. This makes it easier to choose components that suit the home without making assumptions about compatibility.
Frequently Asked Questions About Residential Starlink Installations
Do All Starlink Models Use the Same Mounting Hardware and Cables?
No. Mounting interfaces, cable connectors, adapters and power arrangements can differ by Starlink model. Check the model identifier and the compatibility details for every mount, cable and power accessory before purchasing.
Is a Mesh System Necessary for Every Starlink Home Installation?
No. A mesh system is most useful where a single router does not provide adequate coverage, such as larger homes, multi-storey layouts or detached work areas. Start with the home layout and connection needs rather than assuming extra networking hardware is required.
Should a Starlink Installation Include Battery Backup?
Battery backup is optional. A compatible UPS may be useful when short mains outages are common, but it should be selected separately from the Starlink power supply and matched to the equipment and backup needs.
How to Build a Complete Residential Starlink Installation
A dependable home installation begins with a compatible dish mount and a clear sky view, then brings together the right cable route, indoor network plan and power arrangement. Checking compatibility before ordering each component helps homeowners avoid unnecessary changes once the installation is underway.
For a practical starting point, explore SpaceTek’s residential installation options and ask for support if the dish model or component compatibility is unclear:

Leave a comment
This site is protected by hCaptcha and the hCaptcha Privacy Policy and Terms of Service apply.