
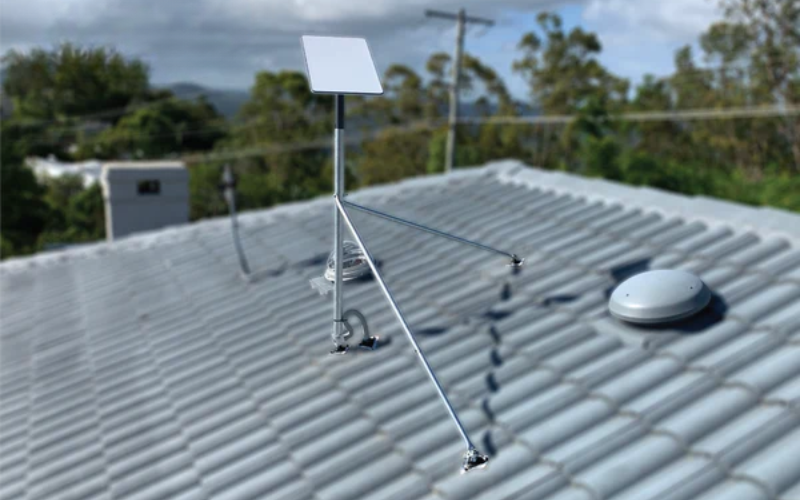
Choosing the right Starlink residential roof mount makes a big difference to how reliable your internet feels day to day, especially on rural and regional Australian properties where clear sky access really matters.
Key Takeaways
- Match the mount to your roof type, whether you have corrugated metal, tile, a sloped roof, a ridge line, or a flat surface.
- Check whether you have a Gen 2, Gen 3, V4, or Starlink Mini setup before buying adapters or mounting hardware.
- Use the Starlink app to check for obstructions before drilling, then fasten the mount into rafters or purlins, not just roof sheeting.
- Seal every roof penetration properly so the installation stays weatherproof through Australian heat, rain, wind, and coastal conditions.
- Choose corrosion-resistant hardware if the dish will live permanently on the roof.
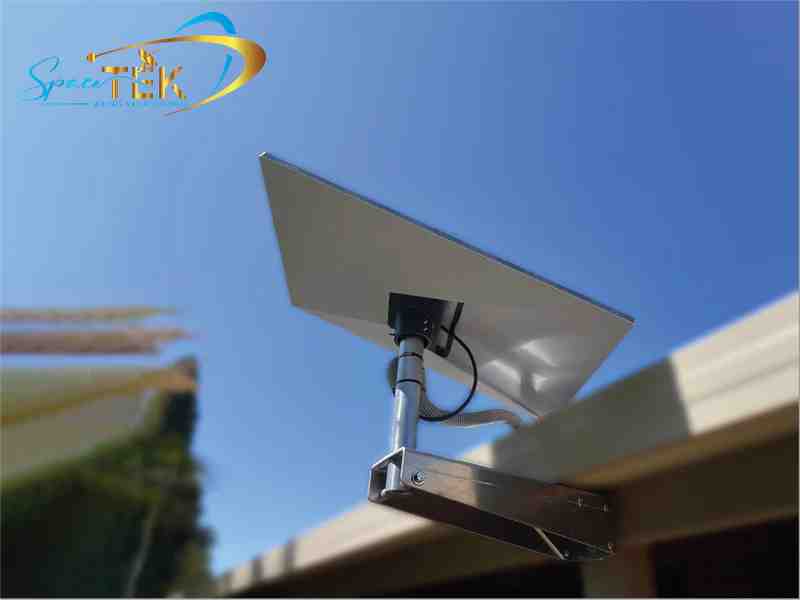
A residential roof mount is a purpose-built mounting system that secures your Starlink dish to your home’s roof and gives it an unobstructed view of the sky. Get that part right and you give your service the best chance of staying fast, stable, and consistent.
Here’s the simple version of how to mount a Starlink dish on a residential roof:
- Choose the right mount for your roof type, such as pivot, ridge, or non-penetrating.
- Check dish compatibility, because Gen 2, Gen 3, V4, and Mini setups can need different adapters.
- Find a clear sky location using the Starlink app’s obstruction tool.
- Drill pilot holes into a structural beam and seal them with outdoor-grade silicone.
- Route the cable safely into your home.
- Align the dish using the Starlink app and lock it in place.
Most homeowners can complete a straightforward installation in under an hour with basic tools, but the mount itself still needs to be chosen carefully.
Most Starlink kits include a basic kickstand for temporary ground-level testing. It is not designed for long-term roof installation. For a permanent setup, you need hardware that keeps the dish secure, clear of obstructions, and stable through heat, wind, rain, and salty coastal air.
That is where the choice can get confusing. There are plenty of third-party mounting options around, and not every official Starlink accessory suits common Australian roof types such as corrugated metal or terracotta tile. The wrong mount can mean poor signal, roof leaks, or a dish that struggles in the first serious weather event.
This guide walks you through how to choose the right mount, check dish compatibility, install it safely, and avoid the common mistakes that cause problems later.
What Is the Best Starlink Residential Roof Mount for Your Home?
No two roofs are exactly the same, so the best mount is the one that suits your roof profile, your dish model, and the conditions around your property. If you try to force the wrong style of mount onto corrugated metal, terracotta tile, or a steep roof pitch, you can end up with leaks, loose fixings, or a dish that never sits quite right.
To help you choose, we have broken down the most common residential mounting styles below. For a deeper dive into matching your specific roof profile, take a look at our guide on how to choose the right Starlink mount for your roof type in Australia.
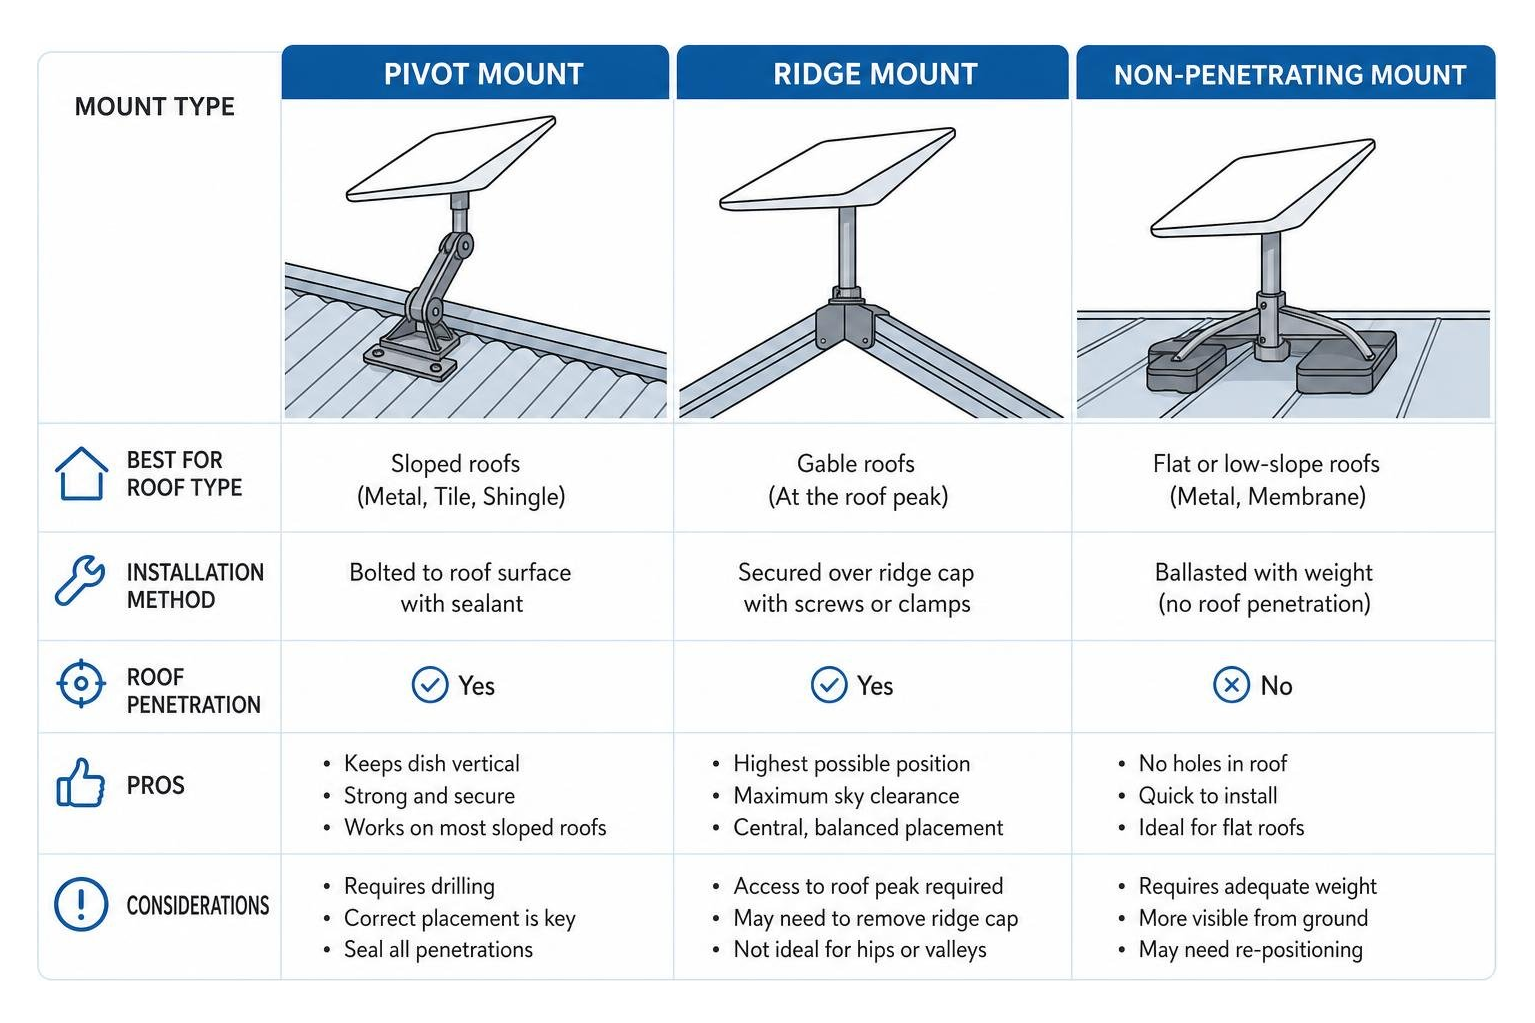
Pivot Mounts
A pivot mount is usually the easiest choice for a sloped roof. It has an adjustable swivelling mechanism, so the mast can stay vertical even when the base is fixed to an angled surface. That vertical alignment matters because your Starlink dish needs the right angle to track satellites properly and avoid strain on the mount or dish.
Roof Ridge Mounts
If you want the dish at the highest practical point on your home, a roof ridge mount sits over the peak of a gable roof. This can be useful when you need extra clearance over nearby trees, sheds, chimneys, or neighbouring structures. Depending on the system, ridge mounts can be fixed directly into the ridge capping or secured without penetrating the roof.
Non-Penetrating Ballast Mounts
If you are renting, protecting a heritage roof, or simply do not want to drill through the roof surface, a non-penetrating mount can be a smart option. These systems sit on the roof and use ballast, such as concrete pavers, to hold the dish in place. They are best suited to flat roofs or gentle slopes where the mount can sit safely and securely.
Selecting a Starlink Residential Roof Mount for Gen 3 and Gen 2 Dishes
One of the easiest mistakes to make is buying a mount before checking which Starlink dish you own. SpaceX has changed the hardware design across generations, and the mounting mechanisms are not all compatible out of the box.
- Starlink Gen 2, also known as the actuated rectangular dish, has a motorised mast that automatically rotates to find satellites. The mast clicks into compatible mounts with a spring-loaded button mechanism.
- Starlink Gen 3 or V4, also known as the standard kickstand dish, removes the internal motors and relies on manual alignment through the Starlink app. It usually needs a dedicated pole adapter or 50 mm mast support to attach to a standard pole.
If you are upgrading to newer hardware, read our guide to Starlink Gen 3 roof mount kits, or browse our range of Gen 3 V4 mounts and accessories.

Why Material Quality Matters for a Starlink Residential Roof Mount
Australian roofs deal with a lot, from intense UV and summer heat to heavy rain, strong winds, and salty coastal air. Cheap imported hardware can look fine at first, but it often fails once it has spent a few months exposed to real conditions.
Flimsy generic mounts often use thin painted steel that can rust, stain the roof, and weaken over time. Once corrosion starts, the mount becomes less secure, which is the last thing you want when your dish is sitting above your home.
At SpaceTek Australia, we build mounting gear for local conditions. Our premium dish mounts use heavy-duty folded aluminium, reinforced components, and stainless steel fasteners, so your setup stays solid, neat, and rust-resistant for the long haul.
How Do You Install Your Dish Mount in Under an Hour?
Installing your Starlink roof mount does not need to turn into an all-day job. If you have the right tools ready and work through the process in order, a straightforward installation can usually be done in under an hour.
Before you start, make sure you have these tools on hand:
- A drill or impact driver
- A 6 mm drill bit for timber pilot holes
- A 10 mm socket or nut driver
- High-quality outdoor silicone sealant
- A digital level, or the level tool in your smartphone
- The Starlink app installed on your mobile device
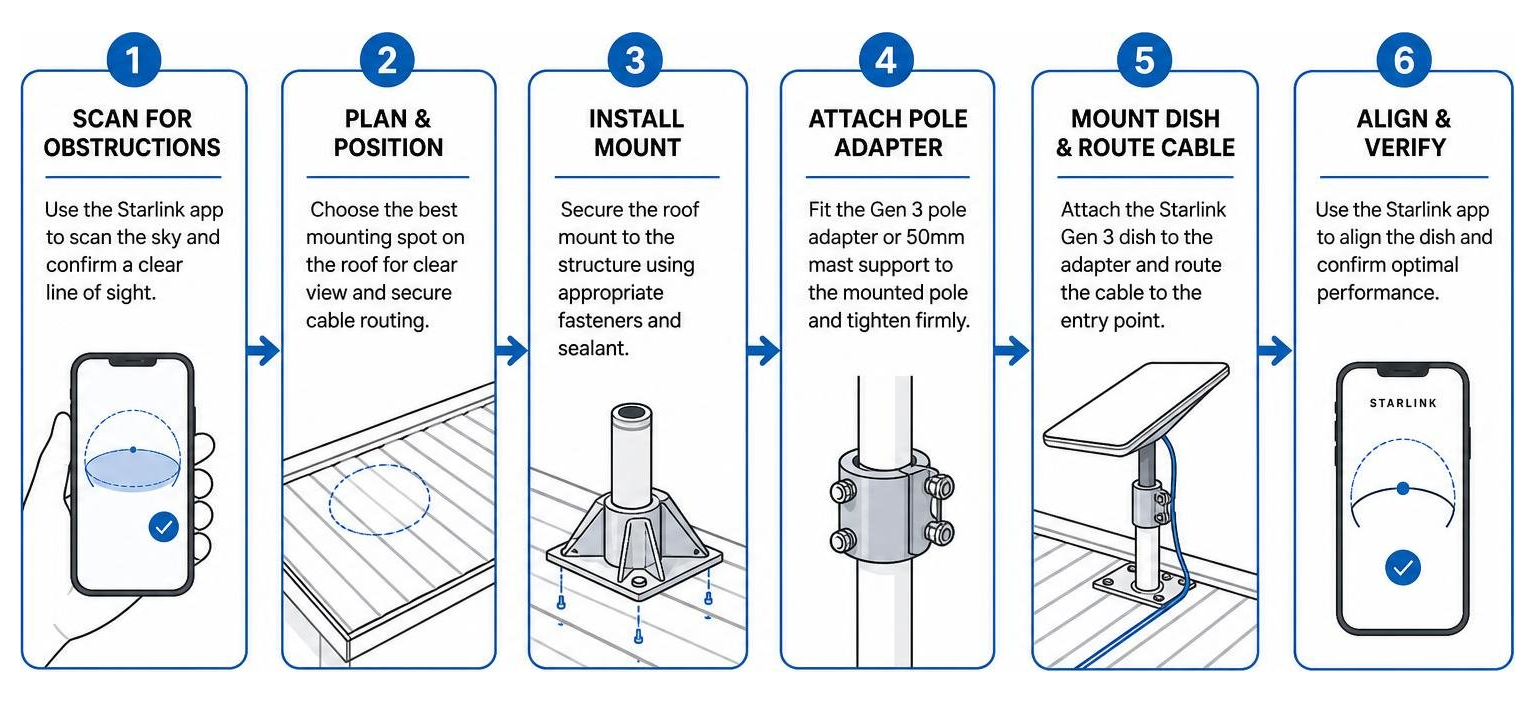
Follow these steps for a quick, secure, and weatherproof installation.
Step 1: Scan for Obstructions
Before drilling anything, take your smartphone up to the roof and use the Starlink app’s obstruction tool. Check the sky from your proposed mounting spot and look for anything that could interrupt the dish’s line of sight, including trees, chimneys, sheds, roof lines, or power lines.
Step 2: Locate the Rafters
Never screw a roof mount only into thin roof sheeting or tiles. The mount needs to be fixed into a structural timber rafter or steel purlin. A stud finder can help, and on metal roofs you can often follow the existing roof screw lines to locate the structure underneath.
Step 3: Drill and Seal Pilot Holes
Mark your mounting holes, then drill pilot holes with your 6 mm drill bit. Before inserting the screws, apply outdoor-grade silicone sealant into the pilot holes to reduce the risk of leaks. If you are using a pivot mount on a sloped roof, the official Starlink pivot mount guide can help with the layout.
Step 4: Secure the Mount and Check Alignment
Drive the lag screws through the mount base and into the rafters or purlins. Before tightening everything fully, use a level to check that the mast is close to vertical. Once it is aligned, tighten the screws securely. For a more detailed walkthrough, read our guide on how to install a Starlink roof mount.
Step 5: Route the Cable Safely
Slide the Starlink cable through the centre of the mast before plugging it into the dish. This helps protect the connector from wind movement and water pooling. If you need to drill a cable entry point into the home, drill on a slight downward angle from inside to outside so rainwater does not track along the cable into the wall. Seal the entry point thoroughly with silicone.
How Can You Power Your Starlink Mini and Gen 3 Off-Grid Setup?
If you live off-grid, travel in a caravan, or regularly head into remote parts of Australia, running Starlink from standard household AC power can waste valuable battery capacity.
Many setups use an inverter to convert 12 V or 24 V battery power up to 240 V AC, only for the Starlink power supply to convert it back down to DC. That double conversion can waste energy as heat, which is not ideal when you are relying on batteries.
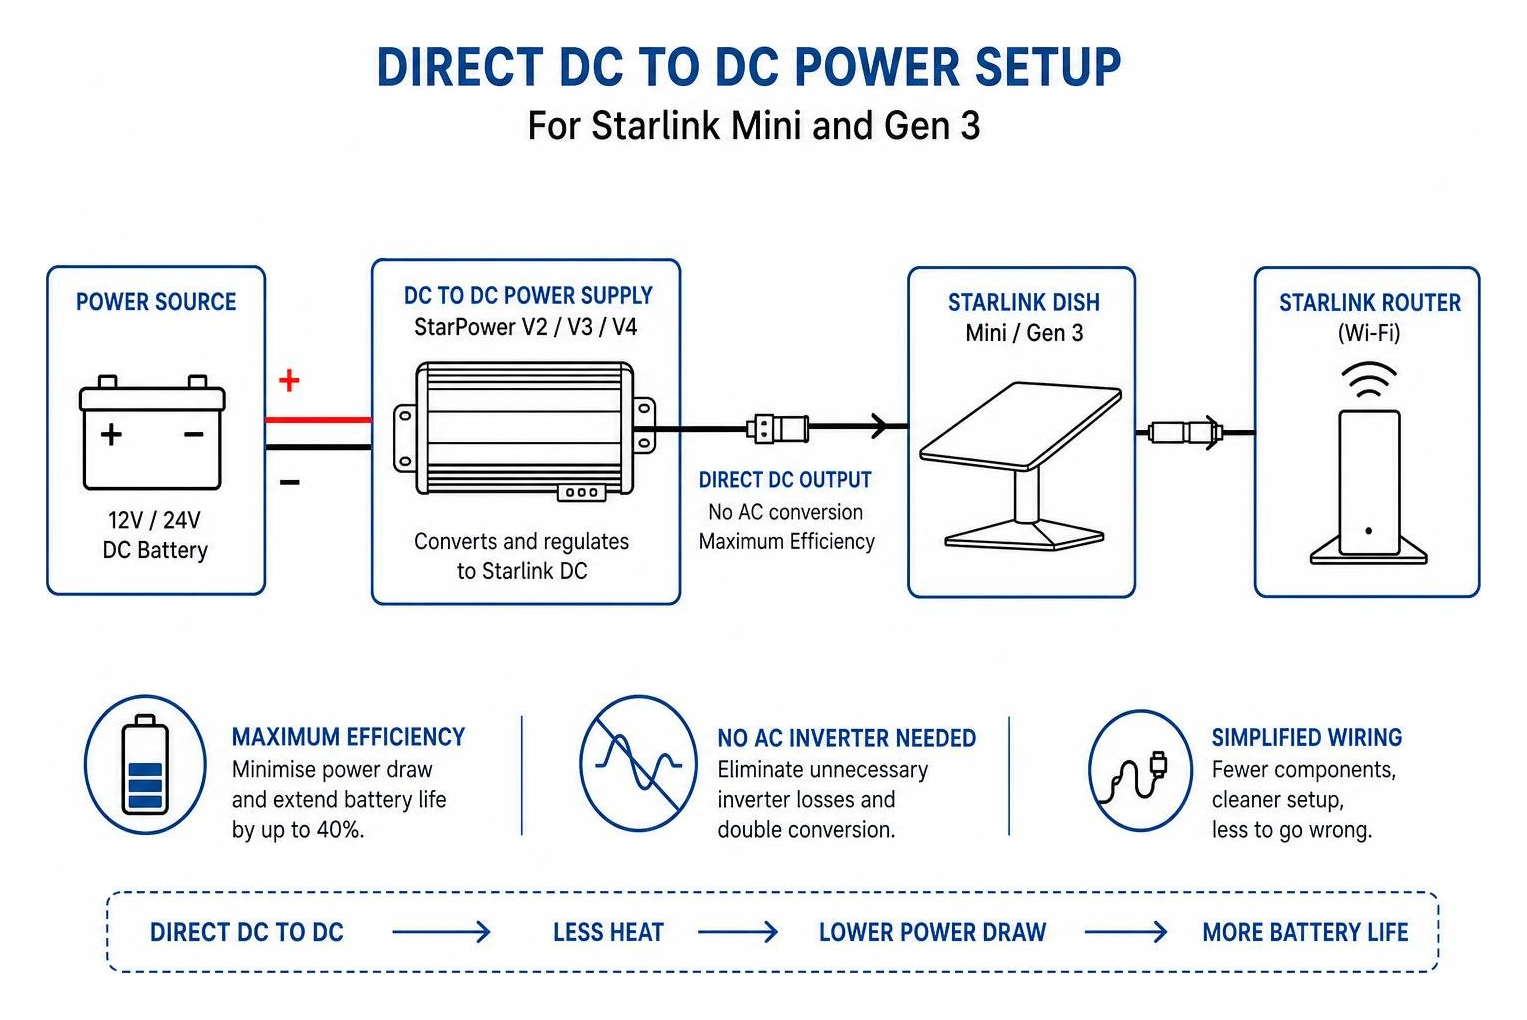
A more efficient option is to bypass the AC inverter and run the system on direct DC power. SpaceTek Australia designs and manufactures StarPower V2 and V3 DC power supplies and DC-to-DC boosters for Gen 3 and Starlink Mini setups. These units let you power Starlink directly from a vehicle, caravan, cabin, or off-grid battery bank.
With a direct DC-to-DC setup, you can:
- Reduce wasted power and extend battery life.
- Remove bulky AC power bricks and inverter clutter.
- Build a cleaner setup with your own efficient 12 V travel router if needed.
Whether you are mounting a dish permanently on a cabin roof or taking your setup on the road, our Starlink Mini portable gear can help keep your power use low and your connection reliable.
Frequently Asked Questions About Starlink Roof Installations
Can I install Starlink on my roof without drilling holes?
Yes. If you are renting or want to avoid penetrating the roof surface, you can use a non-penetrating ridge or ballast mount. These systems sit over the roof ridge or on a suitable flat surface and are held in place with ballast, such as concrete pavers. They can provide strong stability without screws going through the roof cladding.
What causes the "Motors Stuck" alert on Starlink dishes?
The "Motors Stuck" alert usually appears when the internal motors of a Gen 2 dish are physically restricted from rotating or tilting. This can happen if the dish is mounted at a poor angle or too close to an obstruction such as a chimney, gutter, or overhanging roof line. Keep the mast close to vertical and give the dish clear space to move.
Are standard Starlink mounts rated for high winds?
Standard mounts may be suitable for moderate conditions, but exposed Australian homes, coastal properties, and storm-prone areas can need stronger hardware. If your roof sees heavy wind or harsh weather, choose a heavy-duty mount with corrosion-resistant materials and secure structural fixing points.
Your Next Steps with SpaceTek
A well-chosen Starlink roof mount can make your home internet feel far more reliable. By lifting the dish above local obstructions and securing it with the right hardware, you give Starlink the clear sky view it needs to perform at its best.
Australian conditions can be tough on rooftop gear, so it pays to avoid flimsy hardware that may rust, loosen, or fail over time. SpaceTek Australia designs and manufactures heavy-duty, rust-resistant mounting kits and off-grid DC power solutions for local roofs, weather, and remote setups.
If you want help choosing the right mount, adapter, or power solution for your home, reach out to SpaceTek Australia and we will point you towards the setup that suits your roof and your Starlink dish.


Leave a comment
This site is protected by hCaptcha and the hCaptcha Privacy Policy and Terms of Service apply.